Riverside Webinar Tutorial: How to Set Up and Host a Webinar from Scratch (2026)
After I published my comparison of the best webinar platforms in 2026, the number one question I got was: “Can you actually walk me through how to set up a Riverside webinar step by step?” Fair enough. Knowing that Riverside records in 4K and has Magic Clips is one thing. Actually setting up a webinar from scratch: building your registration page, configuring reminder emails, going live, and turning the recording into content afterward. That is a different conversation entirely. So I did it.
I recorded the entire process on video, and this article is the written companion. Think of it as the guide you can keep open in a tab while you build your first Riverside webinar. If you have never used Riverside before, or if you have only used it for podcast recording and want to explore the webinar side, this walkthrough is for you.
Use code FEI to get one month free on Riverside Pro or Livestream plans, and a discount when you upgrade to the Webinar plan.
Watch the Full Riverside Webinar Tutorial
If you prefer to see every click and setting in action, here is the companion video. The article below follows the same walkthrough step by step.
TL;DR: What You Will Learn in This Riverside Webinar Walkthrough
If you are short on time, here is what this Riverside webinar tutorial covers:
- Scheduling a webinar from your Riverside dashboard (takes about 2 minutes)
- Building a registration page with custom fields, branding, and CRM integration
- Setting up automated reminder emails so attendees actually show up
- Going live — what the studio looks like, layouts, screen sharing, and the teleprompter
- Livestreaming to social media (YouTube, LinkedIn, Facebook, Twitch, X, TikTok, custom RTMP)
- Recording settings — choosing between 720p, 1080p, and 4K
- Audience engagement — public chat, Q&A, polls, and studio chat for your production team
- Post-webinar repurposing — accessing your recording, downloading tracks, and using Magic Clips and Magic Segments
If you want a deeper look at how Magic Clips work for content repurposing, I wrote a full step-by-step guide to creating YouTube Shorts with Riverside earlier this year.
Why I Moved My Webinars to Riverside
I have hosted hundreds of webinars. For years, the default was Zoom Webinar. It worked, it scaled, and everyone knew how to join.
But here is what kept happening: after the webinar ended, I would download the recording and get a blurry, compressed file that looked like it was filmed through a window screen.
That is not just a branding problem. That is a content problem. If you are spending two weeks preparing a webinar and the recording is unwatchable on YouTube, you just lost your entire repurposing pipeline.
Riverside’s webinar software solves this because it records locally on each participant’s device. Your internet connection affects the live stream quality, but the actual recording — the file you keep and repurpose — is captured at up to 4K resolution directly on your computer.
That distinction changes everything for creators and marketers who treat webinars as content production sessions, not just live events.
And as of 2026, Riverside now has a full-featured webinar product: registration pages, automated emails, audience roles, live chat, Q&A, polls, call-ins, multistreaming, and HubSpot/Salesforce integration.
It is no longer a recording tool that people hack into a webinar setup. It is a complete webinar platform.
Step 1: Schedule Your Webinar
From your Riverside homepage, click the Schedule button. On the right side, click New and then select Webinar.
Here is what you will fill in:
- Webinar name: Give it a clear title — this appears on the registration page.
- Date and time: You can schedule it days or weeks in advance, or start one in 10 minutes. Your time zone is automatically detected.
- Invite speakers and producers: Riverside has two roles here.
- Guests are your presenters — they appear on camera.
- Producers are your behind-the-scenes technical team — they can control audio, video, and layouts without being seen by the audience. If you have used Zoom Webinar before, think of Guests as panelists and Producers as co-hosts.
- Description: Add a short summary of what the webinar covers. You do not need to invite speakers right away. You can always add them later from inside the session.
Advanced Option: Pre-Recorded Content
Before you move on, there is one feature worth knowing about. Under Advanced, you can upload pre-recorded video (MP4) or audio (MP3, WAV) to play during your webinar. This is useful for product demo segments, intro videos, or polished presentations where you want produced footage instead of live delivery.

Step 2: Build Your Registration Page
This is where Riverside’s webinar setup surprised me the most. The registration system is fully built in — no need for a separate landing page tool, Eventbrite, or Zapier automation.
Registration Form
You can customize the form fields to collect exactly what you need:
Title and description — what the event is about and who is hosting it.
Custom fields — by default it asks for name and email. But you can add phone number, country, and even custom text fields, single-selection dropdowns, and checkboxes. This matters if you are qualifying leads before the event starts.
My recommendation: keep the form short. Every additional field creates friction. For a marketing webinar, name and email is usually enough. If you need lead qualification data (job title, company size), add one or two custom fields maximum.
Visual Branding
You can upload a background image and your company logo directly onto the registration page. There is also an option to hide the Riverside logo for a fully white-labeled look. The result is a clean, branded registration page you can share via email, social media, or embed on your website.
CRM Integration: HubSpot and Salesforce
If you are using HubSpot or Salesforce, Riverside syncs registrant data directly as contact properties. You can track registration source and total minutes attended, which gives your sales team lead qualification data without manual CSV exports.
This is a major upgrade for anyone using webinars as part of a demand generation strategy.

Step 3: Set Up Reminder Emails
This is small but critical. Most webinar no-show rates fall between 40% and 60%. Automated reminder emails are the single most effective way to improve attendance.
Riverside gives you three built-in options:
- One day before the event — catches people who registered early and might forget.
- One hour before the event — this is the most impactful reminder. It catches busy people right before showtime.
- Post-event follow-up — sends automatically after the webinar ends. Perfect for sharing the replay link, a summary, or a CTA.
I recommend turning on all three. If you have run webinars before, you know how much attendance improves when people get that one-hour nudge.

Step 4: Start Your Webinar Session, Inside the Riverside Studio
When it is time to go live, click Start Session from your webinar dashboard. This does not immediately broadcast to your audience — you land in a pre-session setup screen where you can verify your camera, microphone, audio output, and display name.
Once you click Join Studio, you are inside the webinar environment. Even at this point, attendees cannot see you. You are in a private backstage view.
The live broadcast begins only when you click the red Record button. At that moment, two things happen simultaneously: your webinar starts recording locally in high quality, and it goes live to registered attendees.
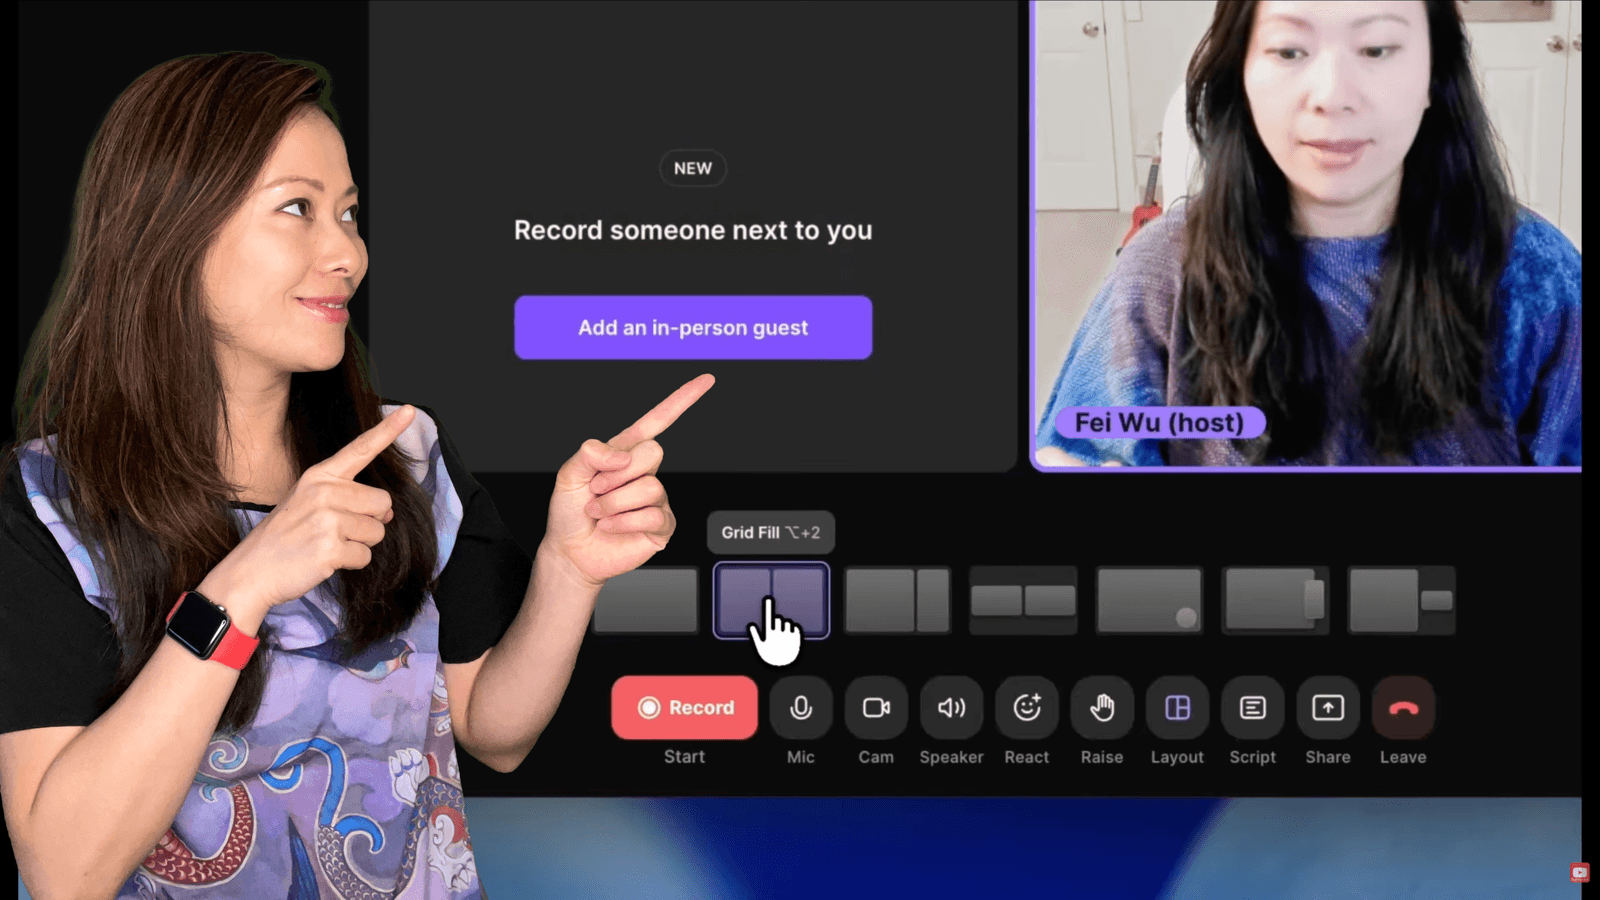
Step 5: Layouts and Screen Sharing
Riverside offers several layout options you can switch between during the live session:
- Full Screen: Just you (or your shared content), no split.
- Grid Fill: Equal split between all speakers — ideal for panel discussions.
- Split Screen: One speaker takes roughly two-thirds of the frame, the other one-third. Good for interviews where you want to highlight the guest.
- Landscape View: Side-by-side speakers.
- Picture-in-Picture (Circle): Your face appears in a small circle overlaid on your shared content. My go-to for slide presentations — you stay visible without covering key information.
- Picture-in-Picture (Square): Same concept, slightly larger and rectangular.
These layouts matter more than people think. If you are presenting slides, picture-in-picture keeps your face visible so the audience stays connected. If you are running a panel, grid fill gives everyone equal screen presence.

Screen Sharing
Click Share to share your screen or a specific window. One important note: if this is your first time, Chrome will ask for screen recording permission. Test this before your live session — you do not want to troubleshoot browser permissions in front of your audience. Once sharing is active, the layout options update to show how your shared content and camera feed are arranged together.

Step 6: Use the Teleprompter
This is one of my favorite Riverside features that most webinar hosts do not know about. Inside the studio, click Script in the bottom toolbar.
You can type your talking points, key phrases, or a full script directly into Riverside. When you are ready, click Teleprompter to switch to a scrolling view centered on your screen.
Here is why this matters: if you position the teleprompter window near your webcam, you can read your notes while maintaining natural eye contact with the camera. No more glancing down at Post-it notes or a second monitor.
You can adjust the scroll speed, pause and restart at any time, and resize the teleprompter window. I recommend practicing with it for a few minutes before going live to find your comfortable reading pace.
Step 7: Livestream to Social Media
You do not have to multistream — you can simply run the webinar for registered attendees and record it.
But if you want to broadcast simultaneously to a wider audience, Riverside supports livestreaming to: YouTube, LinkedIn (personal or company page), Facebook (profile or page), Twitch, X (Twitter), TikTok, and custom RTMP destinations (for platforms like Instagram Live or any other streaming service).
You can configure these before or during the session. Each platform requires a one-time connection to your account.
Pro tip: Even if you do not multistream to social media, Riverside generates a Watch Link — a simple URL where anyone can view your webinar live. If you enabled registration, viewers will be prompted to register first. This gives you flexibility: share the link publicly and still capture lead data.

Livestream vs. Recording Quality — The Key Distinction
This is important to understand. The live stream broadcasts at up to 1080p, depending on your internet connection. But the recording — the file saved locally on your device — captures at whatever resolution you choose: 720p, 1080p, or 4K.
That means even if your live stream hiccups due to a Wi-Fi drop, the recording remains clean and high-resolution. This is the core advantage of Riverside’s local recording architecture, and it is the reason your webinar footage is actually worth repurposing for YouTube, social media, and marketing content after the event.
Step 8: Engage Your Audience — Chat, Q&A, and Polls
The right side of the Riverside webinar studio has two communication channels:
Public Chat
This is visible to everyone watching. Attendees can send messages, ask questions, and react in real time. Within the public chat, you also have access to: Q&A: A dedicated section where audience questions appear separately from general chat.
This makes it easy to track, prioritize, and respond to questions without losing them in the chat scroll. Polls: You can create polls and survey your audience during the session. Great for boosting engagement, gathering feedback, or making interactive decisions live.
Studio Chat (Private)
This is visible only to presenters and producers. Use it for behind-the-scenes coordination — timing cues, technical notes, or deciding which audience question to address next. No more texting your producer on WhatsApp during a live session.
Live Call-Ins
Audience members can request to be brought on-screen during the webinar. If you approve the request, they join the live session temporarily — like a call-in segment on a talk show. They are recorded for the duration of the call-in but do not count toward your 10-speaker limit.
Step 9: Additional Studio Features
A few more features inside the Riverside webinar studio that are worth knowing about:
Branding on the Fly
Under the Branding tab, you can adjust your logo, background, and design elements even while live. There are also overlay options for lower thirds and visual elements.
Live Links
You can create clickable links that appear on screen during the webinar. Type the URL and display text, save it, and show or hide as needed. When attendees click, it takes them directly to that destination. Excellent for promoting a product page, a special offer, or a resource download during your session.
Media Uploads
You can upload media files (up to 100MB, MP4 or MOV) and play them during the webinar. Useful for pre-recorded intros, demo videos, or client testimonials.
Preview vs. Live Mode
There is a toggle between Preview and Live. Preview means only you see and hear whatever you are testing. Live means it goes out to your audience. Always test new content, layouts, or media in Preview mode first — it is your safety net.
Step 10: Recording Settings
Before or during your session, click the gear icon to configure your recording:
- 720p: Fastest upload and processing after the webinar. Good enough if you just need a quick replay.
- 1080p: My usual choice. Strong balance of quality and processing speed for most content needs.
- 4K (UHD): Maximum quality. Conversion takes longer, but the output is broadcast-grade. Choose this if the webinar recording will become a YouTube video or flagship marketing content.
You can also configure:
- Transcript language: Dozens of languages are supported, including Chinese — which, as a bilingual creator, I genuinely appreciate.
- Noise reduction: If you or your speakers are in noisy environments, enable this to clean up the recording automatically.
After the Webinar: Recordings and AI-Powered Repurposing
This is where Riverside’s webinar product earns its keep. Once the session ends, go to Projects in your dashboard to find the recording.
What You Get
- Combined recording: All participants merged into one video file.
- Individual tracks: Separate audio and video files for each speaker. Invaluable for editing — you can adjust each person’s audio independently or cut between camera angles in your video editor.
- Aligned video: If guests joined at different times, this feature syncs all timelines automatically so your editor can line everything up instantly.
- Raw vs. compressed audio: Choose which format to download based on your workflow.
AI Content Repurposing: Magic Clips, Segments, and More
Under the Made for You tab, Riverside uses AI to generate content from your webinar recording automatically:
Magic Episode: An AI-polished edit of the full recording with cleaned-up audio and auto-generated show notes.
Magic Clips: Short vertical clips (usually under 60 seconds) pulled from your best moments. They come with captions and are ready for Instagram Reels, YouTube Shorts, TikTok, and LinkedIn. Each clip gets a Viral Score so you know which ones are most likely to perform well. (I wrote a full guide to Magic Clips and Viral Scores here.)
Magic Segments: Longer landscape clips (2–5 minutes) that work beautifully for YouTube and LinkedIn. These are my personal favorites because they give a guest enough time to finish a complete thought — which builds more authority than a 15-second sound bite.
Hooks: Short attention-grabbing openings designed to pull viewers in.
Posts: AI-generated social media copy based on the webinar content.
Snapshots: Key visual moments captured as still images. From a single one-hour webinar, you can walk away with a dozen or more content assets without ever opening an editing timeline.

Registrant Data and Lead Tracking
Your registrant table includes names, emails, custom field responses, registration source, and total minutes attended. You can download this as a CSV or sync it directly to HubSpot as contact properties. This data is the bridge between your webinar as a content event and your webinar as a lead generation engine. You know exactly who showed up, how long they stayed, and how they found you.
How This Fits Into a 2026 Webinar Content Strategy
Let me be direct about why this matters.
In 2026, the creators, consultants, and marketing teams who win are the ones who extract the most value from every piece of content they produce. A webinar is not a one-time live event anymore. It is a content production session.
Here is the workflow I recommend:
- Host the webinar on Riverside — capture leads through registration, engage the audience live, and record everything in high quality.
- Repurpose immediately — use Magic Clips and Magic Segments to generate social content the same day the webinar airs.
- Publish the full recording on YouTube — the 4K recording quality means it stands on its own as a long-form video.
- Write a companion blog post — embed the video, add SEO-optimized text, and create an evergreen page that drives organic traffic long after the live event.
- Feed registrant data into your CRM — follow up with leads, segment by engagement level, and nurture toward your offer.
One webinar. Five content channels. That is the shift from “hosting events” to building a content engine.
Riverside Webinar Pricing (2026)
Riverside’s Webinar plan starts at $79/month (billed annually). This includes the full webinar feature set: registration pages, automated reminder emails, livestreaming, 4K local recording, audience engagement tools, and CRM integration.
If you are already on Riverside’s Pro plan ($24/month) or Live plan ($34/month) for podcast recording or livestreaming, upgrading to the Webinar plan adds the full event management layer on top of the tools you already use.
Riverside also offers a free plan with limited recording time and basic features, so you can test the interface and editing tools before committing.
All paid plans include a 14-day free trial. Use code FEI to get one month free on Riverside Pro or Livestream plans, plus a discount when you upgrade to the Webinar plan.

Frequently Asked Questions
Can I run a webinar on Riverside’s free plan?
Riverside’s free plan includes basic recording capabilities, but the full webinar features — registration pages, automated reminder emails, audience management, CRM sync — require the Webinar plan starting at $79/month. You can use the free plan to test Riverside’s recording and editing tools before upgrading.
How many people can attend a Riverside webinar?
Up to 10,000 audience members can watch a live Riverside webinar session. You can also multistream to YouTube, LinkedIn, Facebook, and other platforms simultaneously, making your total potential reach essentially unlimited.
How many speakers can be on screen?
You can have up to 10 guest speakers recorded in a single webinar session, plus producers working behind the scenes who are not visible to the audience.
Do attendees need to download anything?
No. Riverside webinars run entirely in the browser. Attendees click a link and watch — no app download required. This removes one of the biggest friction points that platforms like Zoom still have.
Can I integrate Riverside webinars with my CRM?
Yes. Riverside integrates with both HubSpot and Salesforce. Registrant data — including custom form fields, attendance duration, and registration source — syncs directly as contact properties. You can also export everything as a CSV.
What happens if my internet drops during the webinar?
The live stream may be affected, but the recording will not. Because Riverside records locally on each device, your high-quality file is captured regardless of internet conditions. This is the single biggest technical advantage Riverside has over cloud-dependent webinar platforms like Zoom and Livestorm.
Can I use the teleprompter during a live webinar?
Yes. Riverside’s built-in teleprompter lets you load a script, adjust scroll speed, and position the window near your webcam for natural eye contact. It works during webinars exactly like it does in standard recording sessions.
Is Riverside webinar software better than Zoom Webinar?
It depends on your priorities. Riverside delivers significantly better recording quality (4K local vs. Zoom’s compressed cloud recording), built-in AI repurposing tools, and browser-based attendance with no downloads. Zoom supports larger audiences (50,000+) and has deeper enterprise IT integrations. For a full comparison, read my Best Webinar Platforms in 2026 guide.
Feisworld’s Take: Your Webinar Should Be a Production Session
If you are still running webinars on Zoom and downloading grainy recordings that sit in a folder, I want you to try one Riverside webinar. Just one.
Set up the registration page. Invite a guest. Go live.
And then look at what you have when it is over: a 4K recording, separate audio and video tracks for every speaker, a dozen AI-generated clips ready for social media, and a registrant list synced to your CRM.
That is not just a webinar. That is a content production session. And in 2026, that is exactly what a webinar should be.
Ready to try it? Get Started with Riverside (Use Code FEI)
You might also enjoy…

Written by
Fei WuFei Wu is the founder and CEO of Feisworld Media, a Massachusetts-based digital media company helping brands get discovered by people and by AI. An Adobe Global Ambassador and brand partner to ElevenLabs, Synthesia, and 50+ other tech and AI companies, she hosts the Feisworld Podcast (400+ episodes, 500K+ downloads — guests have included Seth Godin, Steve Wozniak, Chris Voss, and Arianna Huffington) and co-created the documentary Feisworld: Live Your Art on Amazon Prime. Fei writes for CNET, Lifehacker, and PCMag, and her work has been featured in Forbes, Harvard Business Review, and WIRED. She has been publishing on the internet since 2014 — long before AI discoverability had a name.
View all posts by Fei Wu→Stay updated
Weekly insights on content, AI, and digital media.
Keep Reading
Related Articles

Ecamm Review 2026: Dual Mode Changed How I Create Video (Here’s How)

The Ultimate Guide to Adobe Firefly Video Generation: Choosing the Right Model for Your Project (2026)
