Filmora Auto Reframe: How to Edit Interviews for YouTube Shorts and Reels with AI (2023)

Do you have a horizontal video that needs to go vertical? Powered by AI technology, the Filmora Auto Reframe feature automatically detects the focal point of your video and crops it, always keeping it in the frame. This way the main action or object of your video never goes out of sight.
What is Filmora Auto Reframe?
Filmora Auto Reframe is a great feature for editing interview videos where more than one person is shown on camera. You can easily edit landscape interview videos to be square or vertical videos for YouTube Shorts, Instagram Reels and TikTok. This provides you with more repurposing options for your existing assets and significantly increase exposure for your content.
Filmora Auto Rerame is as simple as:
- Import your video
- Choose the desired aspect ratio
- (Optional) Adjust frame
- (Optional) Advanced settings for tracking subject and tracking speed
How to use Filmora Auto Reframe (Step-by-step )
1. Open Filmora and choose “Auto Reframe”

2. Import your video by dragging it into the next window, and hit “Import”

The import process is surprisingly fast for me even for hour-long interviews and large files.
3. Choose desired aspect radio on the left-hand-side

4. “Adjust frame” (optional feature)
With it turned on, you’ll be able to easily move the frame left and right to change and adjust framing automatically.
Then under Advanced, you will have the option to choose between Primary vs. Secondary subject. This will shift between focusing on Justin vs. me in the screenshot below, automatically.

Last but not least is tracking speed. Auto Reframe has built-in movement when tracking the subject, introducing more visual interest to your viewers. I typically set it to Default, or Slower.

5. Export
That’s it! When everything’s done, just hit “Export” to save your video.
How to open and access Auto Reframe inside an existing Project?
There are 3 ways to open the Auto Reframe feature in Filmora. The above method is how I typically use Auto Reframe. However, instead of using Auto Reframe for an entire video, you can also apply Auto Regrame on particular clips inside an existing project.
- Import your media by clicking on File > Import Media Files and selecting the file. After your video is imported, right-click on it to select the Auto Reframe.
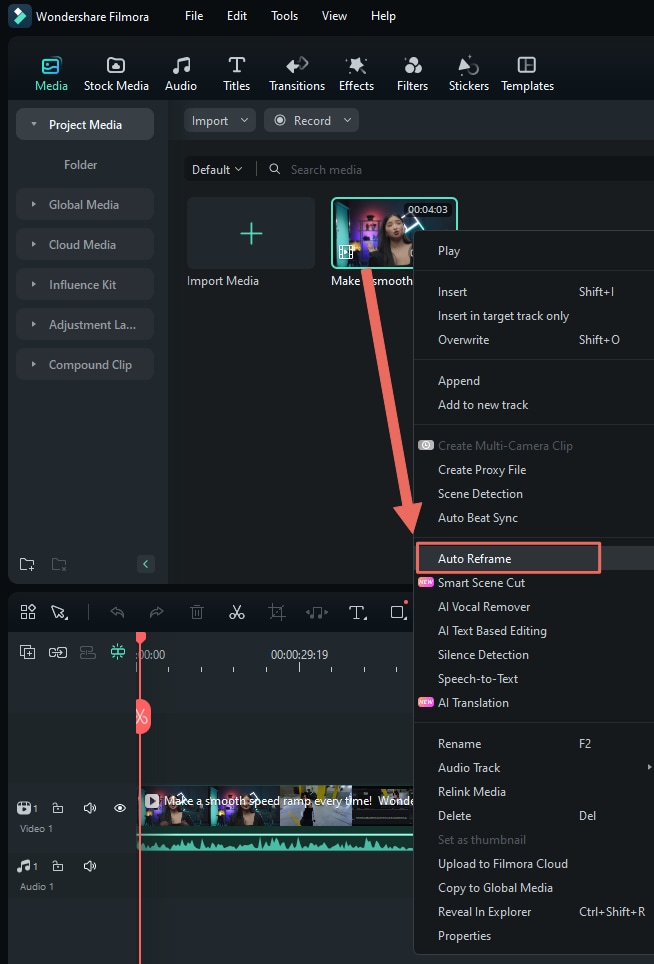
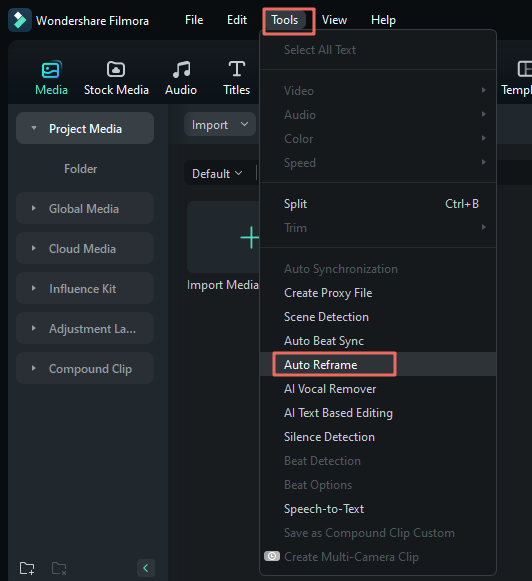
2. Another option is to click on Tools on the top menu bar and click on Auto Reframe.
How to edit the interview clips after Auto Reframe?
I typically save two already auto-adjusted videos – one focused on the primary subject and the other on the secondary subject. In terms of editing the final output, it depends on your editing experience and preference. As for me, I prefer to keep things simple by overlapping two tracks, and I’ll mute one audio track so the audio doesn’t compound.
I put the HOST track on top (in this case, it’s me “Fei”), and my SPEAKER track at the bottom (in this case, it’s “Ed”, the main speaker).
Then I’ll create some additional cuts between the guest and speaker by hiding part of my clip.


What the output looks like, after less than 10 minutes of editing, including import and export.
PRO TIP
Don’t forget to subscribe to our YouTube channel Feisworld Media
Conclusion: Filmora Auto Reframe
We find Filmora Auto Reframe feature to be easy to use and intuitive for beginners. This feature is part of Filmora’s cross-platform video editor. You don’t have to pay extra to take advantage of Auto Reframe.
Filmora costs $49.99/year, making it highly accessible for most creators. We highly recommend it.

Written by
Fei WuFei Wu is the founder and CEO of Feisworld Media, a Massachusetts-based digital media company helping brands get discovered by people and by AI. An Adobe Global Ambassador and brand partner to ElevenLabs, Synthesia, and 50+ other tech and AI companies, she hosts the Feisworld Podcast (400+ episodes, 500K+ downloads — guests have included Seth Godin, Steve Wozniak, Chris Voss, and Arianna Huffington) and co-created the documentary Feisworld: Live Your Art on Amazon Prime. Fei writes for CNET, Lifehacker, and PCMag, and her work has been featured in Forbes, Harvard Business Review, and WIRED. She has been publishing on the internet since 2014 — long before AI discoverability had a name.
View all posts by Fei Wu→Stay updated
Weekly insights on content, AI, and digital media.
Keep Reading
Related Articles

Ecamm Review 2026: Dual Mode Changed How I Create Video (Here’s How)

The Ultimate Guide to Adobe Firefly Video Generation: Choosing the Right Model for Your Project (2026)
