YouTube Recording Setup for Your Small Business 2023 (Budget-Friendly!)

TLDR: YouTube recording setup for your small business needs not to be complicated or expensive. Complicated setups quickly become distractions. We recommend Option 3 (if your budget permits at around $1,500-2,000). Otherwise you can start with Option 1, a setup most of us already have access to, and incrementally add a microphone (Option 2) and later on a professional camera (Option 3), and a lighting kit (Option 4)
YouTube Recording Setup: The Options
Option 1. Just Your Phone or a Webcam and a Natural Light Source
Using just your phone (iOS, Android doesn’t matter) and some natural light is enough to get you started. Remember to face the window (a free source of natural light). Or turn on a room light that doesn’t cast a shadow on your face (avoid overhead light).
If you are using your phone, it’s a good idea to get a tripod to stabilize your device.
Mini-tripods can work well for desks and traveling:
- Manfrotto travel tripod: https://amzn.to/2zJ3ejA
- Bendable tripod such as: https://amzn.to/39dt8LJ or https://amzn.to/33HtAAS
Professional and full-size tripods are more versatile and stable:
- Mactrem professional camera tripod with ball-head: https://amzn.to/2WOIdRF
- AmazonBasic lightweight tripod (60-inch): https://amzn.to/2vNzhRk or (50-inch) https://amzn.to/3brh4s1
Option 2. Adding an External Microphone to Your Mobile Phone (To Improve Sound Quality)
If you have a budget of $1,500, skip over this slide and consider a full upgrade with a camera body, lens and microphone instead – see option 3 below.
Instead of recording directly into your mobile phone, adding a microphone significantly increases the audio quality without breaking the bank.
A lav mic can work for both iOS and Android. There are many options on Amazon and other marketplaces for purchase, such as PoP Voice Professional (https://amzn.to/3wBXzZ8) The downside is that it isn’t designed for when you need to move a lot, but it’s perfectly fine for talking heads and sit-down videos.
There are portable and wireless microphones designed for iOS that allow you to move around easily, such as:
- Shure MV88 Portable Mic for iOS: https://amzn.to/3wtMjOc
- Zoom iQ6 Stereo Mic for iOS: https://amzn.to/2PXaW5j
Option 3 (Recommended) Camera and an External Microphone
Adding the right camera makes a world of difference. After purchasing a few cameras over the years, I’ve settled on Sony a6400 mirrorless camera. This is one of the top choices for many YouTubers. The camera and lens combination create 4K videos with a soft background and a flattering focus on you. It’s easy to color grade in post production with incredible results.
Here’s my exact setup – the cold shoe bracket holds the camera and the external microphone in one place.
- Camera body (Sony a6400 mirrorless camera): https://amzn.to/2ASSyQc
- Camera lens (Sigma 16mm F1.4 DC DN Contemporary Lens): https://amzn.to/2ATRFGU
- Rode mic (compact): https://amzn.to/2O62BaK
- Mactrem professional camera tripod with ball-head: https://amzn.to/2WOIdRF
- 128GB Memory Card (Pro): https://amzn.to/2nrtwEJ (If you think I need it)
- Simple remote control: https://amzn.to/31X9MaV
- ULANZI PT-5 Vlog Cold Shoe Bracket https://amzn.to/32J18MV
Option 4. Adding a Set of Studio Lights
Investing a set of studio lights (usually between $100-200) can be a big time saver. You’ll no longer need to rely on natural light sources which can change rapidly depending on time of day, season and where you reside.
Budget-friendly options
- Neewer two-pack standing light kit: https://amzn.to/2IT86HJ
- Neewer ring light kit: https://amzn.to/2QrtVSP (compact, but not recommended for people with glasses)
- BrightTech LED room light https://amzn.to/2xfpDHr (it’s a great lamp with dim adjustments, but it’s not for very dark rooms. It’s better to get the Neewer two-pack if you can)
Elgato key light and ring light (a worthy upgrade)
- Elgato ring light: https://amzn.to/3FJ93zk
- Elgato key light: https://amzn.to/3YyuCvb
- Elgato master mount and heavy base: https://amzn.to/3jkcCV6
I absolutely love all Elgato products including their wrinkle free backdrop (https://amzn.to/3jfw9WG). The only annoying part of purchasing their ring light and key light is that while their mount works great for desks, you’ll need a master mount and heavy base (which costs about $100 extra) if you want to use the light more freely and be able to move it around. Because Elgato products are particularly popular with the gaming community, many of their products were initially designed for desks.
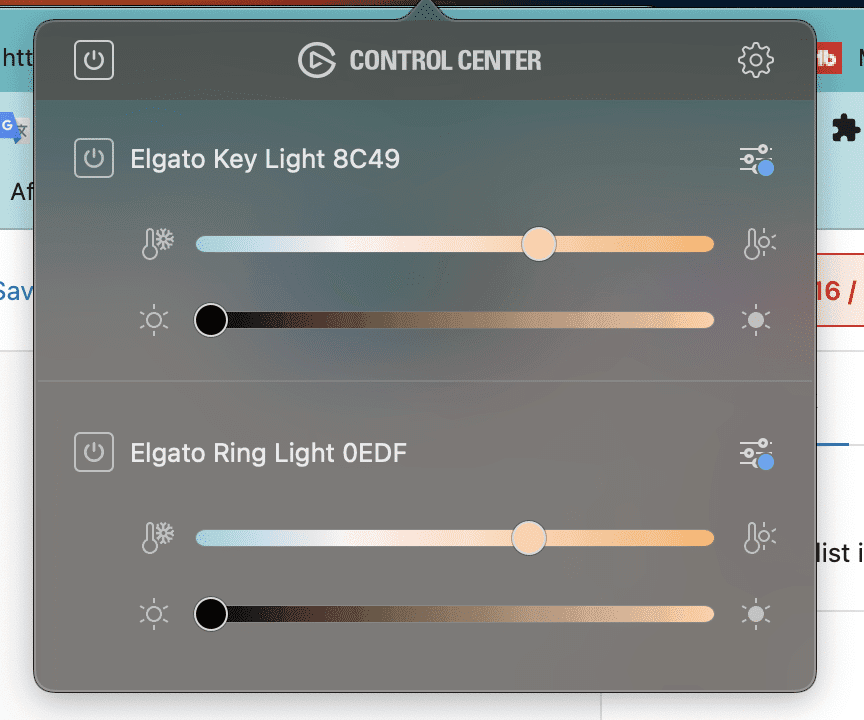
One incredible feature for Elgato lights is the Control Center, where you are able to control and adjust color temperature and intensity easily from your computer.
How strong should the light be?
You need to adjust the brightness, shoot a few videos to get a feel. I like the lights turned up about 30-40% without washing out my face. You can adjust over time and learn what’s most flattering to you.
Final Tip and Trick?
If I may, the best decision is to leave my equipments where they are and easily accessible on a daily basis. Though I do batch create all my content to save time, I also love recording when I feel spontaneous without much planning.
Will you let me know in the comments below how you go about creating YouTube videos for your small business?
Ready to level up? Join our FREE challenge
🎁 Join our FREE 21-day challenge to launch your YouTube Business Channel
We help you with every step to strategize, record and publish the RIGHT videos for your business channel, and begin building an evergreen funnel to convert views to leads.
[fluentform id=”6″]
You might also enjoy…

Written by
Fei WuFei Wu is the founder and CEO of Feisworld Media, a Massachusetts-based digital media company helping brands get discovered by people and by AI. An Adobe Global Ambassador and brand partner to ElevenLabs, Synthesia, and 50+ other tech and AI companies, she hosts the Feisworld Podcast (400+ episodes, 500K+ downloads — guests have included Seth Godin, Steve Wozniak, Chris Voss, and Arianna Huffington) and co-created the documentary Feisworld: Live Your Art on Amazon Prime. Fei writes for CNET, Lifehacker, and PCMag, and her work has been featured in Forbes, Harvard Business Review, and WIRED. She has been publishing on the internet since 2014 — long before AI discoverability had a name.
View all posts by Fei Wu→Stay updated
Weekly insights on content, AI, and digital media.
Keep Reading
Related Articles

Ecamm Review 2026: Dual Mode Changed How I Create Video (Here’s How)

The Ultimate Guide to Adobe Firefly Video Generation: Choosing the Right Model for Your Project (2026)
